7th of November.
First day with Lorenzo and I got started helping with restoration of 1829 classical guitar. First thing I did I started picking out the old bone frets using knife, chisel, little hammer and pliers.

After that I cleaned the holes with a Japanese saw, file and a scraping tool.

Then continued with making the new frets. First we picked a good bone where I started to saw nice bonesticks. After that filing a little radius on the bottom of the fret and when it's all good a little filing off the sharpest corners and sawing it to right length.

8th of November
Today started where we left yesterday to make the last frets and then we started to glue them in place.

Next we started to work on a new guitar. Lorenzo had prepared the wood up to a point. First we cut the 2 back pieces with knife and planed the gluejoint sides.

Simplicity is a virtue. For the gluing Lorenzo's simple method of using just some nails, hammer and a block to steady the back from one side and leaving space for cleaning the joint to other side seems very effective and no need for huge gluing tables.

Then to work on the sides. Draw the imprint of the sides and then we started to work our way towards the desired thickness using a plane with a teethlike blade and finish with a scraper.

9th of November
We continued to work on the lacquer of a guitar Lorenzo has made with another trainee. Varnishing, sanding and polishing. We started this yesterday and continued today. And will continue on it for more days to come.

Also I worked on the 1829 guitar to trim the fret ends and we started to sand them in line with each other.

10th and 11th of November
Thursday was full of varnishing and I finished to reduce the sides to desired thickness.
Friday we started with varnishing again. After that I cut the sides with a knife to right size.

Then we bent the sides (More Lorenzo than me because the sides are pretty delicate and we wouldn't have spares so Lorenzo did most of the work just in case.)

Lorenzo uses 3 part "mold" on the inside when he's done with the bending. I like it better than what I had home where it's one part because it's easier to get the sides there and very easy to keep them in place.

And then we started to work with the back and glued in the horizontal strip for strengthening the back joint. Made the braces for the back and put them in shape using a plane to make their width good, a saw to make their length good which we marked using the back. Then we marked the radius on the braces and started working towards than with a chisel, little handplane and file to get close. After working like this one by one we put the 3 together and used plane to make them all equal.

And the 3 together

Then we started to round and shape the horizontal stripe with a handplane and sandpaper. Afterwards we made the cuts for the braces with knife and chisel. Then we glued the braces and cleaned the joints.

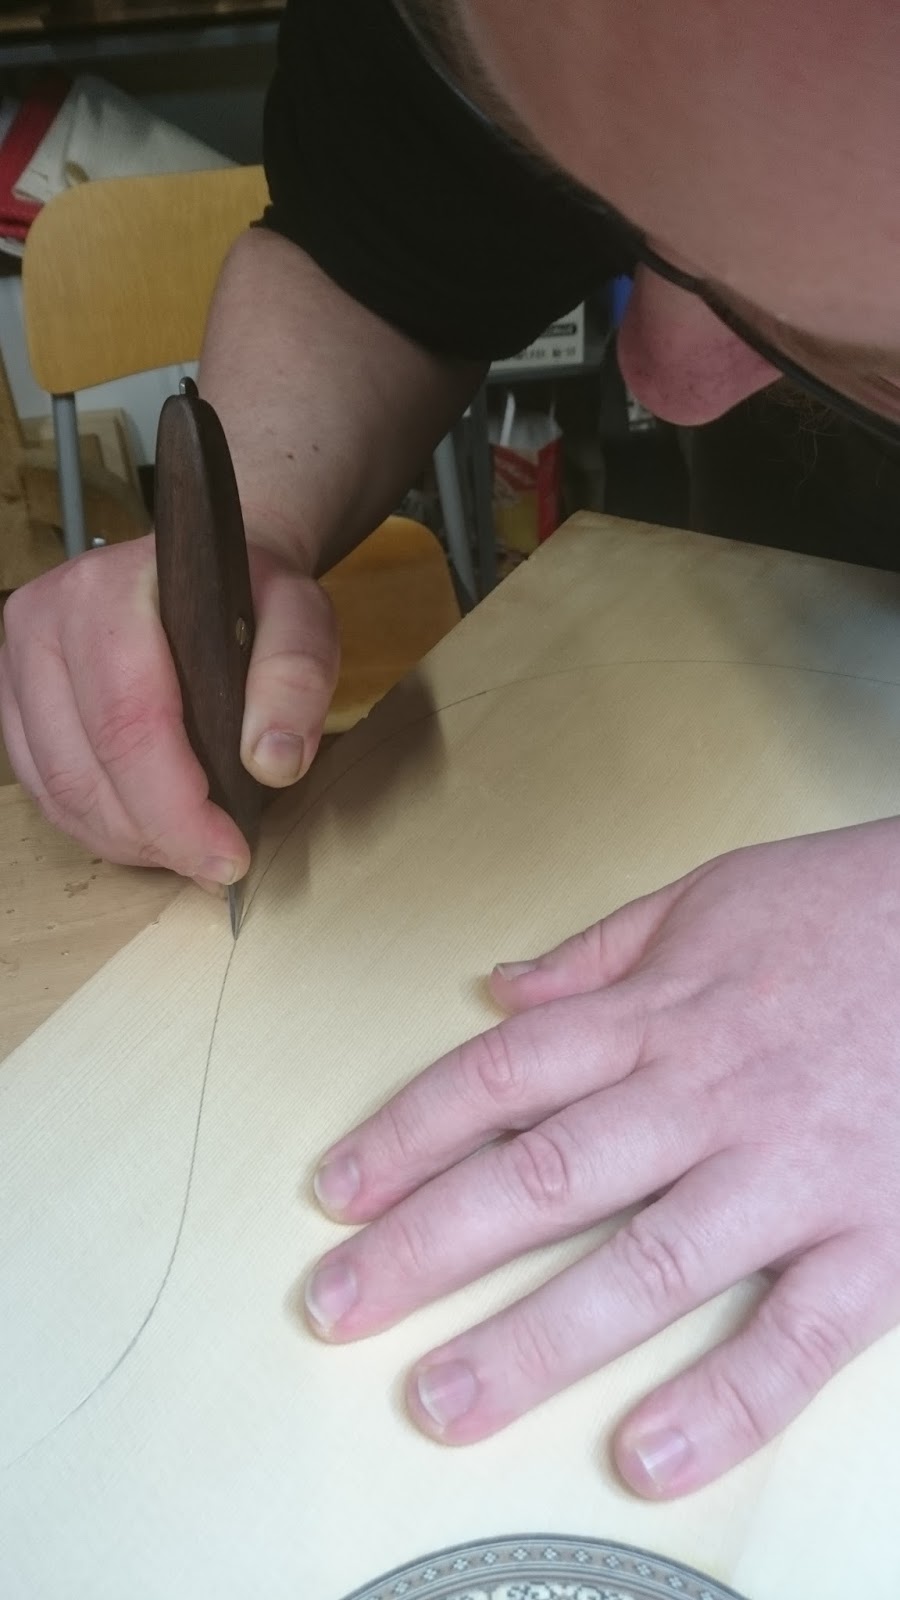
On the top we started working on the rosette. First we picked one and made the outlines of it on the top and then we followed and broke the outline with a knife.

Then we started to work the inside with a round chisel and finish the bottom with a straight one and the edges were cleaned and finished with chisel and knife.

After we were happy with it we glued it in place.

14th of November
Weekend is over and back to work. And the subject who's getting handled is the neck.

Getting the sides to same size and to 90 decree angle. When it was done we marked the place for the joint and sawed the 13 decree angle on that. Then leveling the necks and heads glue surfaces and reducing the head size to near finished thickness. After that we glued the joint.

Afterwards we leveled the sides again what little it needed, then to level the joint/head and finish the heads thickness. Then we started to make the heelblock. All the leveling and work above was done with planes and file.
15th of November
Finished the heelblock parts and sawed the headplate veneers (the wood was in right thickness so just sawing). Then we glued the heel and the veneers on the neck.

Top was on the tasklist next and first we scraped the rosette clean and leveled it. Then to start from the inside of the top to reduce the thickness with a little plane and when we got most of it and were close we scraped and used a powertool to sand the finish. We also did a little of this to level the outside of the top too.


Satisfied with the thickness and I picked a knife to cut the outlines of the top.
Then we pushes a whole where the soundhole should be and sawed open the hole and with a knife finished the hole and rounded the corners with sandpaper.

This took only 30 minutes and Lorenzo said it could be done in lot less. As I have done it before with routers and such I really think this is the better approach than powertools. Takes a bit of training but eventually worth it and all you need is a figure saw and a knife.
Then to finish the day drawing the bracing and such inside the top.

This is where we are at now.


16th of November
Most part of the day went with varnishing. Later we made the braces and glued them. Preparing the braces was made with plane for the width and thickness, then sawed to length. Lorenzo likes to verify the best direction to plane/cut the braces and mark it and put every brace the same way so when you glue and work with the braces afterwards every brace is cut the same direction and behaves the same.

When the gluing was done we sawed the necks heel from the sides and planed it to 90 decree.

17th of November
Today we started with the gluing the braces that were left unglued yesterday.

Afterwards we sawed the block and heel of the neck and then started to draw the fingerboard on the both sides and then the headstock. And then some sawing again on the headstock. With a plane to finish the sides of it and with rasp and file to finish the end of the headstock.

Then to draw the lines and points for drilling the holes for the machines. Using the marks and a tool to help with the drilling we did the holes.

After we marked the holes on front and back of the headstock and a few marks for some holes we will use to cut out the inside. We drilled a little 3mm guiding hole for the larger 12mm drills spike and drilled the holes. Then to saw the insides out.

Then to start roughing the holes with rasp until later finished with sandpaper.

18th of November
Today we started to work more on the bracing, shaping and cleaning them on both the back and top.

The little ones with chisel, scraping tool and sandpaper and with the larger ones we used a little plane for the rounding.

After all the work on top and back bracing was done we started to work on the neck. Sawing extras off from the sides and from the heels sides too.

21st of November
Morning varnishing once again for 2 guitars. Reason for this is to do it before making dust and we do all the work in the same room.

Then afterwards we started again with the neck. Shaping the heel with chisels to get the shape a little closer.
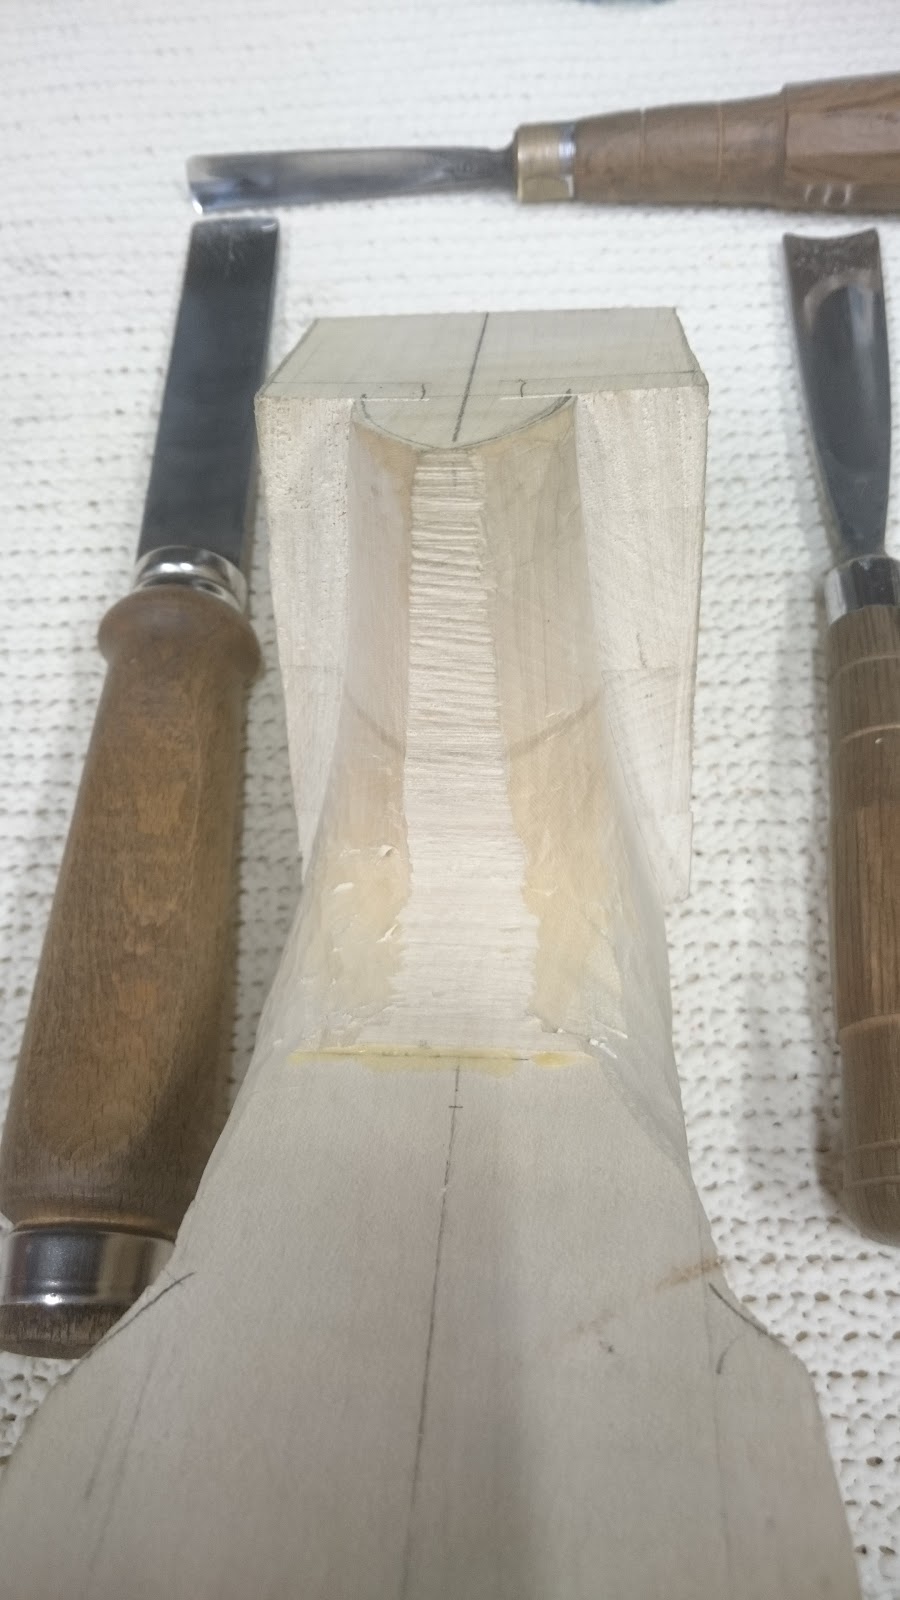
When we were happy with it for the moment we sawed a bit of the block from inside to get a better access to the heel.

After sawing we used a chisel and rasp to clear and clean the hole and make it even. Then we shaped the heel with chisels and knife and cleaned it with a file in the end.
Then we reduced a bit from top of the block to make space for the top to lie even with the neck. Then we cleaned the shape of the top a bit for it to fit the mold fine. Marked the sides where the block will be and sawed them to fit in the neck.

22nd of November
This morning we started to finish the block for the back and neck. After that we made 2 of these little wooden blanks to with the holes to push the side-ends to the heel.

All the blocking done we glued the neck and blocks on the top and the sides on the neck and backblock.

Then we started to make kerfling because all we had were tropical ones. First we took a few sticks of cherry and planed their thickness and width.

Then we made a little jig for sawing the kerfling. By hand ofcourse.

23rd of November
We continued to work on the kerfling and gluing but realized it wasn't enough so we made more kerfling. When the top was glued and enough kerfling done we did a bit of varnishing. Today was a bit more uneventful but none the less a productive day.
24th of November
Varnishing to start the day once more. Then we worked a bit on the sides to get them all near the finished measure and each side in line with the other side.

25th of November
Varnishing and starting to glue the kerfling for the back.

While we waited for the glue to dry we started to make the enforcements for the sides. Sawing, planing, shaping with chisel and finishing with file and sandpaper.

After gluing comes the cleaning. So cleaning the sides and the top and the kerfling from inside with scraper and sandpaper.

When it was clean enough we glued the tops side enforcement pieces.

28th of November
Monday and varnishing. Then we started to plane the sides after the kerfling was glued again to makes sure it's leveled and in good measures.

After we glued the backs side enforcement pieces by marking the spot on the side after taking the measurement of the corresponding brace on the back.
Wating the glue to dry we started to make the fingerboard. First planing the piece to same wideness all over. Second we marked the middle line. Third we marked where every fret will be and sawed the fret lines.

When all lines were done we marked 52mm on the nut and 62mm on 12th fret and made lines and chiseled/planed the excess wood off.

Glue is dried and we started to work on the sides/back again. To reduce a bit from the side enforcement pieces to make the back fit nicely with the sides. We want the back braces to be just in touch with the enforcements but ofcourse not to carry the back away from the sides. This is done by marking the places and chiseling the enforcements/braces and looking inside with a light when the back is closed to make sure the kerfling touch the back and the enforcement tips are linear and not in an odd angle.
29th of November
Today we started the last few touches and cleaning of the whole body from inside and put lacquer everywhere inside that will not be glued (the sides, front and back blocks, kerfling that won't be glued on the back and the back and braces but not near the edge that will be glued on the sides and kerfling). Also the top from inside wasn't lacquered. This was done to make and preserve the inside more tidy and clean looking.

A picture where the lacquer was used on the back. Perhaps the flames were talking to Lorenzo to do this also.

Then we started to glue the back using titebond.

While the glue was drying we did a bit of varnishing.

After lunch we cut the excess wood on the back with a great spray of wood made by a router. And then we cleaned.. the floor. And the table. And everywhere.

...and finally we cleaned the sides and same time worked out the irregularities of the sides.

After we started to bend the bindings for the sides.

30th of November
Today started with making of the back stripe (making a piece left from the sides into wanted size and gluing black/white/black veneer on it) and then sawing a place for it.

Then making space for the bindings with a router on the sides.

Because we can't get to all places with the router (for some reasons they don't come with blade that makes 45 or 90 decree angles) we finished the ends for the binding with knife and chisels.
Back/heel

Top/fingerboard

And on the backstripe

Also we made sure that all around the body the edges were good and regular. There were some irregularities that we worked out simply with chisels and knife and made sure the angles were 90 and also that in any corner there is nothing keeping up the bindings.
Then we worked on the fingerboard a bit to finish the day. Just to make the round end on the soundhole end of it.

1st of December
First thing today we glued the bindings and purfling for the top. Starting from the back towards the neck and when near the neck cut the end of the binding. For the top this was easier as there's only a hole that gets hidden under the fingerboard so it's not that precise. Same work for the back but on heel end is a 45 decree(ish) "inside" the heel (shown in yesterdays pictures of the back/heel.)

Afterwards comes the cleaning with a rasp that's not very aggressive and with chisel on the waist until we finish with a scraping tool/sanding paper.
At the end of the day we also glued the fingerboard.

2nd of December
First off we planed the fingerboard where we wanted it and to give it just a slight radius (measured just by eye having a straight object to compare it to). After this we finished sawing the fret holes.

Because a client showed up and played I dropped the sawing for a moment to a less noisy work and I did a bit of work on the headstock. Using chisel and rasps I worked the heads curve near the saddle.

Did not get to finish it all but got a good start on both holes. I continued to saw the frets and afterwards to add the frets themselves. First we just cut a bit having the fret on the hole, then worked the ends of the fret to a 45 decree angle for the part that goes inside the hole and a clean 90ish in the end of the fret itself. After that we hammered the fret in the hole.

After all the frets were in we glued the ends with attack and filled the hole-ends with wax. We did this to save time because it was almost the end of the last day now. Normally we would have made a bit of dust from the same material used on fretboard (in this case walnut) and fill the ends with it.

And here it is as far as we got the guitar made.


The end
I am very happy how far we got the guitar in just 4 weeks and I learned so much about different methods and how to approach them with handtools. Many things can be as easily done by hand than with machines. Ofcourse some things are easier and faster with machine, but machines are very unforgiving, take time to prepare the work and the jigs and the blades and everything. Make a big mess, use a lot of space, require constant maintenance. It takes some work ofcourse to become efficient with handtools, but Lorenzo showed me that it can be very efficient and effective. Most of the time to me it seemed it was only planning ones work which is always important no matter by hand or machine and that you know well how to work the rough work and the precise work with the right equipment. Working with Lorenzo was a great honor and I am very fortunate I got this chance to visit his shop.